Ръководство за PANTHEON™

 Категории
 PANTHEON Help - Welcome
[Collapse]PANTHEON
 [Collapse]PANTHEON упатства
  [Collapse]Guide for PANTHEON
   [Collapse]Settings
    [Expand]Subjects
    [Expand]Items
    [Expand]POS
    [Expand]Manufacturing
    [Expand]Personnel
     Calendar
    [Expand]Financials
    [Expand]Customs
    [Collapse]Program
     [Expand]Document Types
     [Collapse]Reports in PANTHEON
       Settings in Administration Panel
      [Expand]Reports Register
       Print Preview
      [Collapse]Report Designer
        Control Keys
        Mouse Control
        Object Inspector
        Data Tree
       [Expand]Toolbars
        Designer Options
        Report Settings
        Page Options
      [Expand]Creating Reports
      [Expand]Groups and Aggregates
      [Expand]Formatting and Highlighting
       Nested Reports (Subreports)
      [Expand]Specifics of Printouts in PANTHEON
      [Expand]Script
       Report Design Considerations
      Document Texts
      Delivery Methods
     [Expand]Loyalty Cards
     [Expand]Administration Panel
     [Expand]Dashboard Components
      Dashboard Reports
      Ad-hoc analysis
     [Expand]ARES
      SQL urejevalnik
    [Expand]Documentation
    [Expand]Logon
   [Expand]Orders
   [Expand]Goods
   [Expand]Manufacturing
   [Expand]POS
   [Expand]Service
   [Expand]Financials
   [Expand]Personnel
   [Expand]Analytics
   [Expand]Desktop
   [Expand]Помощ
   [Expand]Старите продукти
   [Expand]Messages and Warnings
   [Expand]Additional programs
  [Expand]Ръководство за PANTHEON Търговия
  [Expand]Ръководство за PANTHEON Vet
  [Expand]Ръководство за PANTHEON Фермерство
 [Expand]PANTHEON потребителски ръководства
[Expand]PANTHEON Web
[Expand]PANTHEON Гранула
[Expand]Потребителски сайт

Load Time: 750,0053 ms
print   |
Label

Designer options

Designer Options

Designer options are set via the “View>Options...” menu command.

clip0056


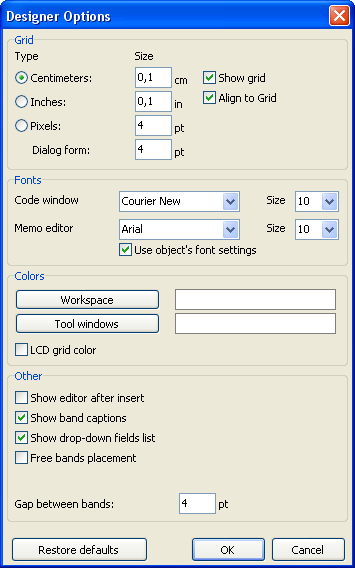
Here you can set the preferred units (centimetres, inches, pixels) and grid spacing. Tip: you can also cycle through the units from within the designer by double-clicking on the left part of the status bar where the current units are displayed.

You can set grid visibility and alignment to grid. This can also be done via buttons in the “Standard” toolbar from within the designer.

You can set a font for the code editor window and for the “Text” object editor. If the “Use object's font settings” option is enabled, the font in the text editor window matches the font of the object being edited.

The default white background of the designer workspace and tool windows can be modified via the “Workspace” and the “Tool windows” buttons.

The “LCD grid color” option increases contrast of the grid lines a little and improves their visibility on LCD monitors.

The “Show editor after insert” option controls what happens when new objects are inserted. If the option is enabled, its editor will be displayed each time an object is inserted. When creating a large number of blank objects, it is recommended to temporarily disable the option.

Disabling the “Show band captions” option hides band captions, so saving some space on a design page. When disabled, the band captions are shown inside the band workspace.

The “Show drop-down list of fields” option controls whether the drop-down list is accessible when pointing with the mouse to “Text” objects which are connected to data fields. This may be necessary if there are many narrow “Text” objects in a band

The “Free band placement” option disables snapping of bands to the page. This option is disabled by default and bands are automatically grouped on the page according to their function. The gap between bands is set in the “Gap between bands” field.


Оценете темата
Темата беше ли ви полезна?
Коментар
Вашият коментар ще бъде видим и във форума!