PANTHEON™ Help

 Toc
 Početna stranica - PANTHEON uputstva
[Collapse]PANTHEON
 [Collapse]PANTHEON priručnici
  [Expand]Vodič po Datalab PANTHEON FarmAccounting
  [Expand]Vodič po PANTHEON Retail
  [Expand]Vodič po DataLab PANTHEON™
  [Expand]Vodič po PANTHEON VET
 [Collapse]PANTHEON korisnički priručnici
  [Expand]Korisnički priručnik za DataLab PANTHEON
  [Expand]Korisnički priručnik za PANTHEON Vet
  [Expand]Korisnički priručnik za PANTHEON Maloprodaju
  [Expand]Korisnički priručnik za PANTHEON Farming
[Collapse]PANTHEON Web
 [Collapse]Vodiči po PANTHEON Web
  [Expand]Vodič za PANTHEON Web Terminal
  [Expand]Vodič po PANTHEON Web Light
  [Expand]Vodič za PANTHEON Web Legal
  [Expand]Arhiva starih proizvoda
 [Collapse]Korisnički priručniki za PANTHEON Web
  [Expand]Kako započeti s programom PANTHEON Web
  [Expand]Korisnički priručnik za PANTHEON Web Light
   Korisnički priručnik za PANTHEON Web Terminal
  [Expand]Korisnički priručnik za PANTHEON Web Legal
  [Expand]Arhiva starih proizvoda
[Collapse]PANTHEON Granule
 [Collapse]Vodič za PANTHEON Granule
  [Expand]Granula Kadrovi
  [Expand]Granula Putni nalozi
  [Expand]Granula Dokumenti i zadaci
  [Expand]Granula Nadzorna ploča
  [Expand]Granula B2B naručivanje
  [Expand]Granula Servis na terenu
  [Expand]Inventar Fiksne Imovine Granula
  [Expand]Granula Inventura skladišta
 [Collapse]Korisnički priručnik za PANTHEON Granule
   Početak
   Primjer korištenja PANTHEON Granula u fiktivnom preduzeću
  [Expand]PANTHEON Granule i aktivacija
  [Expand]Granula Kadrovi
  [Expand]Granula Putni nalozi
  [Expand]Granula Dokumenti i zadaci
  [Expand]Granula B2B Naručivanje
  [Expand]Granula Nadzorna ploča
  [Expand]Granula Servis na terenu
   PANTHEON Granule - česta pitanja i odgovori
  [Expand]Inventar Fiksne Imovine Granula
  [Expand]Inventar u skladištu granula
  [Expand]Arhiva
[Collapse]Korisničke stranice
  Test 2
  Test 3
  Test 5
  TEST_Kreiranje noveg zaposlenika 1000003067
  TEST_Kreiranje noveg zaposlenika 1000003067-MK
  TEST3_Kreiranje novog dokumenta 1000003410-SL
  TEST2_Uređivanje kontaktnih podataka 1000003415-SL
  Test
 [Collapse]Test za CG
   Test podređeni 1
  TEST_Kreiranje noveg zaposlenika 1000003067-BA
  TEST_Kreiranje novog zaposlenika 1000003067-SR
  TEST_Kreiranje noveg zaposlenika 1000003067_EU_ORIG
 [Collapse]Pantheon hosting
  [Expand]Hosting robot
  [Expand]DEMO hosting
  Porez ( cookies )
 [Collapse]Prijava na korisničke stranice
   Registracija za Pantheon korisnike
   Glavna stranica
   Prva posjeta korisničkom sajtu
  Novosti
  Uvod u Wiki
  Upute za stranicu izbornika
 [Collapse]Potpora
  [Expand]Tehnička podrška
   Podrška na daljinu za Host korisnike
  [Expand]Daljinska podrška
  Kako upotrebljavam i dopunjujem wiki ?
 [Collapse]Pomoć
   Pantheon Hosting
   Uporedba verzija pantheona
  [Expand]Dokumentacija
   Vsa navodila
   Video uputstva
   Video novosti
   Pitaj druge korisnike
   Postanite PANTHEON svetovalec
   Sve vijesti
   Svi događaji
   Pregled opomb i planova
   Plan
 [Collapse]Informacije
   Obavijesti
  [Expand]Nastavitev deviznih tečajev
 [Collapse]Moji podaci
   Ugovor o osvježavanju
   Podaci o kompaniji
  [Expand]Pooblaščene osobe
   Dovoljenja
   Lični podaci
   Kontaktni podatci
   Osveževalna pogodba
 [Collapse]Forum
   Spremljanje foruma
 [Collapse]Video
   Instruktivni videozapisi
   Video Ažuriranja
  Portal za razvijače
  Tržnica
 [Collapse]Wiki uputstva
  [Expand]Uvod u wiki
  [Expand]Pretraga po Wikiju
  [Expand]Uređenje Wiki-a
   Pripenjanje dokumentov

Load Time: 375,0076 ms
"
  6613 | 1 | |
Label


"Subject list" report

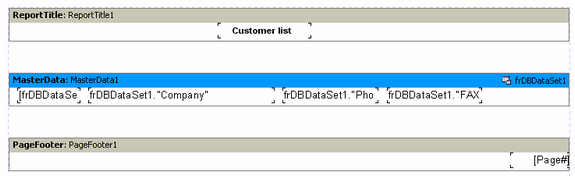
Open Report register and create new report. Set report "Name" to Subject List. Open the FastReport designer by selecting clicking the “Design...” menu item in Wizard. ​ In report designer window click the “New report” button there to automatically create a basic report design with three bands (“Report title,” “Master data” and “Page footer”). On tab "Data"  and drag a “TfrxDlDBTable” object and drop it onto the workplace. Set property "TableName" to tHE_SetSubj. In this table data about subjects are stored. 

Now let’s design the report. First, add a “Text” object containing “Subject List” to the “ReportTitle” band.

Next, connect the “MasterData” band to our dataset. This can done in any of three ways:

- double-click on the band

- select “Edit...” in the band’s contextual menu

- or click on the “DataSet” property of the band in the Object inspector.

Now place four “Text” objects (which will display the client number, customer name, phone and fax fields from the dataset) on the band. Let’s do this in several different ways to demonstrate some features of the FastReport designer.

 The first way is to place a “Text” object on the band and type "[DlDBTable1."acSubject"]" into it. This is the least convenient way, since the field link has to be entered manually, with the possibility of incorrectly typing the text. Somewhat easier is to use the expression designer - double-click the “Text” object and click the leftmost button on the “Text” tab of the editor window which opens. To insert our field double-click the field name in the expression designer. Click the OK button to close the dialogue and see the field link inserted into the “Text” object.


The second way of adding the DB field to the “Text” object is by setting two properties in the object inspector. Place a second “Text” object on the band, without writing anything in the editor window. Set the object’s properties using the object inspector:


DataSet = frxDBDataSet1

DataField = 'Company'


Both of these properties are presented as a list, so just select the required value from the drop-down using the mouse.


The third way is to “drag and drop” the required field from the “Data tree” pane into the report. This is the simplest and easiest way, but before doing it uncheck the “Create header” checkbox at the bottom of the “Data tree” pane, otherwise a second “Text” object, containing the field’s name, is created in addition to the field link object itself. In this way select the “Phone” field and drag it onto the band.


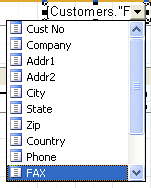
The fourth way requires the designer option “Show drop-down fields list” flag to be set (via main menu : “View>Options”) and the band to be already connected to the dataset. Place a blank “Text” object on the band and hover the cursor over the object – a drop-down button will appear at the right hand end. Click this button to open the list of DB fields and select the ”FAX” field.


clip0148


Our report design is complete.


_img85

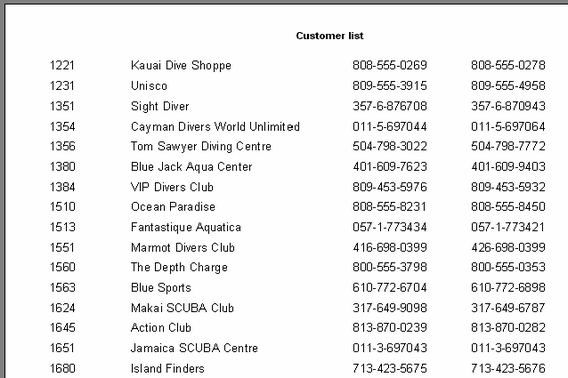
Click on the “Preview” button to see the result.

_img86


Rate this topic
Was this topic usefull?
Comments
Comment will also bo visible in forum!