PANTHEON™ Help

 Toc
 Početna stranica - PANTHEON uputstva
[Collapse]PANTHEON
 [Collapse]PANTHEON priručnici
  [Expand]Vodič po Datalab PANTHEON FarmAccounting
  [Expand]Vodič po PANTHEON Retail
  [Expand]Vodič po DataLab PANTHEON™
  [Expand]Vodič po PANTHEON VET
 [Collapse]PANTHEON korisnički priručnici
  [Expand]Korisnički priručnik za DataLab PANTHEON
  [Expand]Korisnički priručnik za PANTHEON Vet
  [Expand]Korisnički priručnik za PANTHEON Maloprodaju
  [Expand]Korisnički priručnik za PANTHEON Farming
[Collapse]PANTHEON Web
 [Collapse]Vodiči po PANTHEON Web
  [Expand]Vodič za PANTHEON Web Terminal
  [Expand]Vodič po PANTHEON Web Light
  [Expand]Vodič za PANTHEON Web Legal
  [Expand]Arhiva starih proizvoda
 [Collapse]Korisnički priručniki za PANTHEON Web
  [Expand]Kako započeti s programom PANTHEON Web
  [Expand]Korisnički priručnik za PANTHEON Web Light
   Korisnički priručnik za PANTHEON Web Terminal
  [Expand]Korisnički priručnik za PANTHEON Web Legal
  [Expand]Arhiva starih proizvoda
[Collapse]PANTHEON Granule
 [Collapse]Vodič za PANTHEON Granule
  [Expand]Granula Kadrovi
  [Expand]Granula Putni nalozi
  [Expand]Granula Dokumenti i zadaci
  [Expand]Granula Nadzorna ploča
  [Expand]Granula B2B naručivanje
  [Expand]Granula Servis na terenu
  [Expand]Inventar Fiksne Imovine Granula
  [Expand]Granula Inventura skladišta
 [Collapse]Korisnički priručnik za PANTHEON Granule
   Početak
   Primjer korištenja PANTHEON Granula u fiktivnom preduzeću
  [Expand]PANTHEON Granule i aktivacija
  [Expand]Granula Kadrovi
  [Expand]Granula Putni nalozi
  [Expand]Granula Dokumenti i zadaci
  [Expand]Granula B2B Naručivanje
  [Expand]Granula Nadzorna ploča
  [Expand]Granula Servis na terenu
   PANTHEON Granule - česta pitanja i odgovori
  [Expand]Inventar Fiksne Imovine Granula
  [Expand]Inventar u skladištu granula
  [Expand]Arhiva
[Collapse]Korisničke stranice
  Test 2
  Test 3
  Test 5
  TEST_Kreiranje noveg zaposlenika 1000003067
  TEST_Kreiranje noveg zaposlenika 1000003067-MK
  TEST3_Kreiranje novog dokumenta 1000003410-SL
  TEST2_Uređivanje kontaktnih podataka 1000003415-SL
  Test
 [Collapse]Test za CG
   Test podređeni 1
  TEST_Kreiranje noveg zaposlenika 1000003067-BA
  TEST_Kreiranje novog zaposlenika 1000003067-SR
  TEST_Kreiranje noveg zaposlenika 1000003067_EU_ORIG
 [Collapse]Pantheon hosting
  [Expand]Hosting robot
  [Expand]DEMO hosting
  Porez ( cookies )
 [Collapse]Prijava na korisničke stranice
   Registracija za Pantheon korisnike
   Glavna stranica
   Prva posjeta korisničkom sajtu
  Novosti
  Uvod u Wiki
  Upute za stranicu izbornika
 [Collapse]Potpora
  [Expand]Tehnička podrška
   Podrška na daljinu za Host korisnike
  [Expand]Daljinska podrška
  Kako upotrebljavam i dopunjujem wiki ?
 [Collapse]Pomoć
   Pantheon Hosting
   Uporedba verzija pantheona
  [Expand]Dokumentacija
   Vsa navodila
   Video uputstva
   Video novosti
   Pitaj druge korisnike
   Postanite PANTHEON svetovalec
   Sve vijesti
   Svi događaji
   Pregled opomb i planova
   Plan
 [Collapse]Informacije
   Obavijesti
  [Expand]Nastavitev deviznih tečajev
 [Collapse]Moji podaci
   Ugovor o osvježavanju
   Podaci o kompaniji
  [Expand]Pooblaščene osobe
   Dovoljenja
   Lični podaci
   Kontaktni podatci
   Osveževalna pogodba
 [Collapse]Forum
   Spremljanje foruma
 [Collapse]Video
   Instruktivni videozapisi
   Video Ažuriranja
  Portal za razvijače
  Tržnica
 [Collapse]Wiki uputstva
  [Expand]Uvod u wiki
  [Expand]Pretraga po Wikiju
  [Expand]Uređenje Wiki-a
   Pripenjanje dokumentov

Load Time: 343,7745 ms
"
  6613 | 1 | |
Label


Highlighting

Conditional Highlighting

There is a possibility to change the "Text" object's appearance depending on the given conditions. For example, an object can be highlighted with red color if it has a negative value. This feature is called "conditional highlighting". To set up it, select the "Text" object and click the btn24 button on the "Text" toolbar.You will see the following dialog window:


highlight


It is possible to define one or several conditions and set up the style for every condition. Style can contain one or several settings:


frame;
fill;
font;
object's visibility.


You can indicate, which settings need to be changed when the condition is met. For this, check the needed setting using the checkbox.


In order to create a new condition, click the "Add" button. You will see an expression editor. Here, it is possible to write any expression which returns a boolean result. In many cases you will use the "Value" variable, which contains the currently printing value.


Let us look at the following example: we have a "Text" object, in which we print the amount of products in stock:


[Products."UnitsInStock"]


We want to paint the object red, if the amount of products = 0. For this, we create the following condition:


Value = 0


Attention: if you have selected C++Script as a script language (see more details in the "Script" chapter), you should write the condition using C++Script:


Value == 0


In the given case, we used the "Value" variable, which has got a printed value. If there are several expressions in an object, then this variable will have the value of the last expression. Instead of "Value", you can use a data column:


<Products."UnitsInStock"> = 0


Configure the style for the given condition in such a way that only fill can be used, and choose the red color:
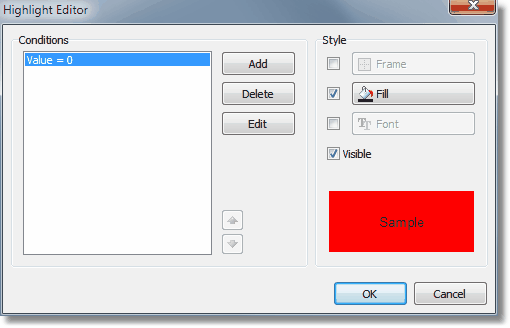
 

highlightRed


When printing an object which has a zero value, it will be red. Let us make our example more complex, we will add another condition. If the units in stock is less than 10, it must be printed yellow. To do this, open the condition editor and click the "Add" button. The second condition will be like this:


Value < 10


In case where several conditions have been indicated, FastReport checks all the conditions, starting from the first one. If a certain condition is met, FastReport applies its style settings to the object, and the process stops. It is important to put the conditions in a correct order. The order which we have seen in this example is correct:


1. Value = 0

2. Value < 10


If we swap conditions, then the highlighting will work wrongly.


1. Value < 10

2. Value = 0

In the given case, the "Value = 0" will not be executed, because when the value is zero, then the first condition will be met. In order to change the order of the conditions, use the btn208 and btn209 buttons.

Coloring Alternate Data Rows

Using conditional highlighting, it is easy to create reports having a "banded" look, where data lines are alternately colored. To save some effort, let's use the “Customer List” example that we designed previously.


Remove all the “Text” objects from the “MasterData” band. Place a “Text” object on the data band and stretch it to cover almost all of the band space:


clip0183


This object will change its color dependent on the data line number. Select the object and set the following conditional expression in the Highlight tab of the object editor:


<Line> mod 2 = 1


Note: if you have selected C++Script as the script language (see more details in the "Script" chapter), you should write the condition using C++Script as:


<Line> % 2 == 1


Select a gray as the color for highlighting, not too saturated a color, but closer to white. Now the other objects can be added to the data-band on top of the first empty “Text” object:


clip0184


On preview the report produces this output:
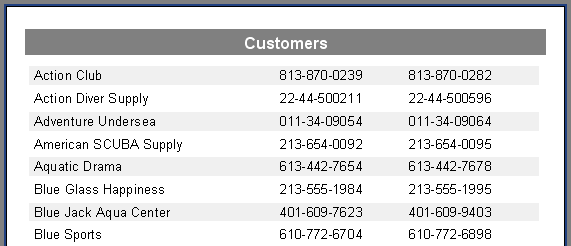
 

clip0185


Rate this topic
Was this topic usefull?
Comments
Comment will also bo visible in forum!